
 Microsoft Windows
 Microsoft Office
 Office for Mac
 Windows Server
Short answer first. To turn Secure Boot on you reboot, press Del or F2, find the Security tab in BIOS, flip Secure Boot to Enabled, and save. Five clicks usually. The tricky part is not the toggle itself. It is the stuff that blocks the toggle: CSM still running, disk still on MBR, or the factory keys got wiped by someone before you. I have dealt with all three in 2026 already, and the fix is different for each one. This guide walks through how to secure boot every mainstream Windows PC in circulation, brand by brand, with a quick wizard up top so you do not have to read the whole thing unless you want to.
Quick Wizard: What Your Next Step Is
Before rebooting into anything, try this. Three questions. Answers in ten seconds. The wizard spits out the exact sequence for your specific situation so you are not reading the whole article if you do not need to.
Yeah, the wizard is purely client-side. No data leaves your browser. Works offline after the page loads. Built with zero dependencies so it loads fast on any connection.
What This Feature Actually Does
Secure Boot has been part of UEFI since roughly 2012. Here is what happens when you press the power button. Firmware wakes up. Before it hands off to Windows, it checks a cryptographic signature on every piece of boot code in the chain. Windows Boot Manager, Option ROMs from your GPU, the kernel, driver modules, all of it. Signed with a key the firmware trusts? Boot continues. Anything unsigned or signed by some random key? Boot halts. So yeah, simple as that.
Most vendors ship boards with Microsoft’s signing keys already loaded from the factory. Microsoft documents the whole spec on Microsoft Learn if you want the technical deep dive. In day to day use, what it actually stops is bootkits, some ransomware variants, and random unsigned drivers trying to sneak in before your antivirus has even started. Does not catch everything. But catches a lot.
Three terms people mix up: Secure Boot, UEFI, TPM 2.0. Not the same thing. UEFI is the firmware standard that replaced old BIOS. SB is one feature inside UEFI. TPM 2.0 is a separate security chip (or firmware module on newer CPUs) that stores encryption keys. Windows 11 wants all three. The feature by itself does not care about TPM. However, Windows 11 setup does.
Before You Learn How to Secure Boot: The Prerequisites
Four boxes have to be ticked for the setting to be available at all. Skip any one and you get either “Unsupported” or a greyed out toggle.
- UEFI boot mode. Not Legacy BIOS. Not CSM. If your PC still boots in Legacy, the feature literally does not exist as a feature yet.
- GPT partition style on your Windows drive. MBR disks only boot in Legacy, which is a dead end here.
- Factory Platform Key loaded. If someone cleared the keys (often happens on machines that had a custom Ubuntu setup), the firmware sits in Setup Mode and it cannot enforce anything even if you flip it on.
- Windows 10 build 1703 or newer, or any Windows 11. Older Windows builds flip out when you change boot mode under them.
Honestly, if your machine is from 2018 or later and came with Windows preinstalled, you probably have three of these already. CSM is the one nobody thinks about. A lot of vendors ship new boards with Legacy Boot enabled for compatibility and never flip it off. But free to fix, five seconds in BIOS.
How to Check If the Feature Is Already On
Do not just charge into BIOS. Figure out what state you are in first. Ten seconds, costs you nothing:
- Press
Win + R. - Type
msinfo32. Hit Enter. - In System Summary, find these two lines: BIOS Mode and Secure Boot State.
So four possible combinations. Each one points at a different fix:
| BIOS Mode | Secure Boot State | What this means |
|---|---|---|
| UEFI | On | Already there. Go enjoy your day. |
| UEFI | Off | Quick fix. Reboot into BIOS and flip the toggle. |
| UEFI | Unsupported | Keys cleared, or CSM interfering. Bit more work. Keep reading. |
| Legacy | Off or Unsupported | Disk is MBR. Convert to GPT, switch boot mode, then flip. |
Heads up. If msinfo32 says Legacy, please do not just hop into BIOS and switch to UEFI. Your machine will fail to boot next time. Bootloader is still tied to an MBR layout that UEFI cannot read. There is an entire section further down on the conversion. Read it first.
Prefer the command line? Two PowerShell one-liners skip msinfo32 entirely:
Confirm-SecureBootUEFI. Returns True, False, or throws if the firmware does not support the feature at all.(Get-SecureBootPolicy).Publisher. Pulls the publisher GUID, handy on machines under domain policy.
There is a registry value too, at HKLM\SYSTEM\CurrentControlSet\Control\SecureBoot\State, under the key UEFISecureBootEnabled. 1 means on, 0 means off. This is literally what msinfo32 pulls from. Setting it by hand does nothing, do not bother.
How to Secure Boot from Inside Windows
Fastest path, especially on laptops where you have no idea which F-key the vendor picked. Windows can boot straight into UEFI settings without the boot key dance:
- Win + I opens Settings.
- System, then Recovery.
- Under Advanced startup, click Restart now. It asks for confirmation. Say yes.
- Blue screen pops up. Pick Troubleshoot, then Advanced options, then UEFI Firmware Settings, then Restart.
- You are in BIOS. Head to Security or Boot (varies by brand), find the toggle, flip to Enabled.
- F10, confirm, reboot.
- Back in Windows, re-run msinfo32. Should say On now.
This works on anything. Desktop, laptop, 2-in-1 convertible, gaming tower, handheld like a Steam Deck booted to Windows. No F-key guesswork.
How to Secure Boot by Motherboard Brand
If Windows will not boot, or you just want to cold-start straight into BIOS, the entry key depends on who made the board. Every vendor picked their own.

ASUS motherboards and laptops
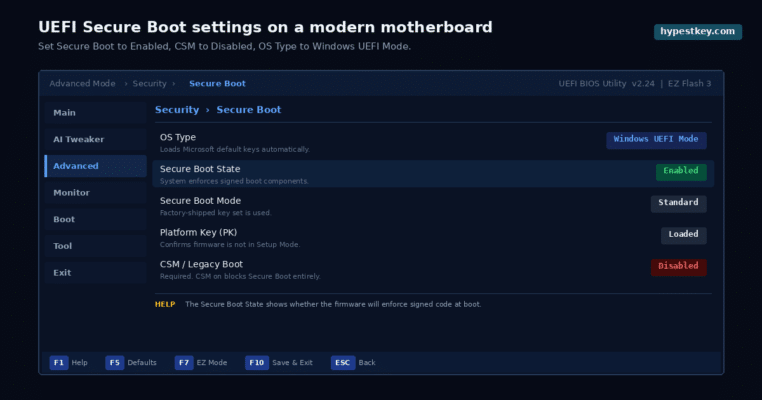
Power on, mash Del (desktop boards) or F2 (laptops). If you end up on EZ Mode, hit F7 for Advanced. Then Boot, then Secure Boot, then OS Type. Flip it to Windows UEFI Mode. If it still shows Not Active after saving, dip into Key Management and pick Install Default Secure Boot Keys. Save with F10. I hit this exact issue on a ROG Strix B650E last month. Previous owner had reflashed the BIOS and the keys were wiped. Ten second fix once you know where to click.
MSI motherboards
Del at boot. Open Settings, then Advanced, then Windows OS Configuration. First thing, kill CSM. Then set Secure Boot to Enabled and Secure Boot Mode to Standard. Save, exit. On older MSI boards from 2019 or earlier the path is slightly different, it lives under Advanced, Windows OS Configuration, Secure Boot, Enable with a different label. But same idea though.
Gigabyte motherboards
Del during POST. Gigabyte messes with people the most, because the menu does not even show up while CSM is on. So step one: BIOS, then CSM Support, Disabled. Save with F10. Reboot back into BIOS. Now the menu appears. Flip it on, set mode to Standard. Then save. Done.
ASRock motherboards
F2 or Del. Security ▸ Secure Boot. Enabled. If greyed out, bounce over to the Boot tab and set CSM to Disabled first. ASRock BIOS is honestly the cleanest of the four big names. So two clicks on any board from 2021 onwards.
Dell laptops and desktops
Tap F2 on laptops and OptiPlex desktops. F12 on some models, then pick BIOS Setup from the menu. Head to Boot Sequence or Boot Configuration. Boot List Option needs to be UEFI. Find Secure Boot, expand, set Secure Boot Enable to Enabled. Newer Dells with the blue graphical interface put it under Boot Configuration, Secure Boot, Enable Secure Boot as a slider.
HP laptops and desktops
Mash Esc right after power on. When the Startup Menu pops up, press F10. Security, then Secure Boot Configuration. HP throws a scary warning, just press F10 to accept. Flip Legacy Support to Disabled and flip the toggle to Enabled. Save. HP sometimes asks for a four-digit PIN shown on screen after you confirm. Not an error. That is an anti-tamper check. Then type the digits, press enter.
Lenovo ThinkPad, IdeaPad, Legion
Lenovo splash screen shows, tap F1 (ThinkPad) or F2 (IdeaPad and Legion). Security ▸ Secure Boot. Enter, flip to Enabled. F10 to save. ThinkPads may also need you to double-check Boot Mode under the UEFI tab and it needs to read UEFI Only. Not Both. Because Both is a trap.
Watch: Enabling Secure Boot on Any Board
If menus make more sense when you see them, Overclockers UK put together a five-minute walkthrough covering the four big brands back to back. If you learn better by watching, it is worth the time.
How to Secure Boot When the Toggle Is Greyed Out
Menu is there. Toggle will not click. Classic. Three causes, in order of how often I run into them:
- CSM or Legacy Boot still on. Firmware refuses to enforce it while it is also accepting unsigned Legacy bootloaders. Would defeat the point. Kill CSM, save, reboot, try again.
- Disk is MBR. Some boards detect this and just grey out the toggle instead of letting you trash your install. Convert the disk first. See the section below.
- Platform Key missing. Inside BIOS, look for Key Management, Restore Factory Keys, or Reset to Setup Mode followed by Install Default Keys. Loading default keys takes one click and drops the Microsoft certificates back into the firmware.
There is a rarer fourth cause too. If you swapped a motherboard and brought a BIOS chip across, or flashed a modded BIOS, the keys could be invalid or missing entirely. Same fix as option 3, plus possibly a BIOS reflash from the vendor’s official file.
Convert MBR to GPT Without Reinstalling Windows
Microsoft ships a tool called mbr2gpt. Does the conversion in place, no reinstall, no data loss. Back up first anyway because Murphy’s Law never sleeps.
- Open Command Prompt as Administrator.
- Run
mbr2gpt /validate /disk:0 /allowFullOS. Wait for “Validation completed successfully”. If it errors instead, your layout has weird extra partitions the tool will not touch and you are better off doing a clean install anyway. - Run
mbr2gpt /convert /disk:0 /allowFullOS. It takes about 30 seconds on an SSD. - Reboot straight into BIOS.
- Flip Boot Mode from Legacy to UEFI, or disable CSM (depends on your board’s menu structure).
- Enable Secure Boot.
- Then save, reboot, back into Windows.
That /disk:0 at the end. It means disk 0. Check Disk Management, right-click on your Windows volume, Properties, Volume tab, look at Disk number. Adjust if yours is disk 1 or 2. Do not run this against your data drive by mistake. Because that is how people lose files.
Fixing the “Unsupported” Error and Other Weirdness
“Unsupported” in msinfo32 is a different state from “Off”. It tells you the firmware thinks the feature cannot run at all. Usually one of these:
- Platform Key cleared, firmware in Setup Mode. Load default keys via Key Management. Save. Reboot.
- Board too old. Anything from before roughly 2012 predates Secure Boot entirely. No software trick will make it work. Time for a new motherboard.
- Windows originally installed over Legacy BIOS. Run mbr2gpt, convert to GPT, flip Boot Mode. State usually changes from Unsupported to Off. So now you can enable it.
- Secure Boot Mode stuck on Custom. Flip back to Standard. Standard uses the Microsoft keys shipped from the factory.
Another weird one I see a lot on the Microsoft Q&A forum. BIOS says it is Enabled. msinfo32 says Off. Nine times in ten, stale Windows state or a BIOS quirk. Full power off (not a restart, a proper shutdown for five seconds). Boot back up. Re-check. If msinfo32 still lies, a BIOS update from the vendor usually clears it.
How to Secure Boot for a Windows 11 Install
If the reason you landed here is the Windows 11 setup throwing “This PC can’t run Windows 11”, you are in the right place. That feature is half the check. TPM 2.0 is the other half. Both need to be on before setup starts, not flipped mid-install. Our complete Windows 11 requirements guide covers the full hardware checklist if other things might be blocking.
When you run Windows 11 setup from USB, the installer checks in this order: CPU model first, then RAM, then TPM, then the SB check. If only that last check failed, the other three already passed. So one thing left to fix. Pop into BIOS, flip it, rerun setup. We wrote a full walkthrough on installing Windows 11 from USB if you want the whole sequence. Or clean Windows 11 installation which covers every pre-install check end to end.
How to Secure Boot for Valorant, EA, and BF6
Gaming anticheat started demanding it back in 2023 with Valorant Vanguard. EA Javelin followed in 2024 and locked the same rule into Battlefield 6 and the latest Call of Duty Black Ops. Same reason across all of them. Kernel-level anticheat wants proof the boot chain was not tampered with, and this feature is the cheapest way to prove it.
See the “you must enable SB to play” popup? Fix is the same as for any regular Windows install. Follow the Windows-side steps up top, relaunch the game. Nothing to configure inside the game itself. The anticheat reads Secure Boot State through the same Windows API msinfo32 calls. So when Windows reports On, the game launches.
Windows Server 2019, 2022, and 2025
Same flow as desktop, with one gotcha. Server boards from Dell PowerEdge, HP ProLiant, Supermicro, usually ship with it off because OEMs assume admins will load custom drivers, run VMware, run KVM, whatever. Get into the remote console first (iDRAC on Dell, iLO on HP, IPMI on Supermicro), mash the same BIOS entry key the desktop equivalent uses, find Security, then Secure Boot, flip to Enabled. Server hosting VMs? Enable the feature on each guest VM separately too. Hyper-V and VMware both have per-VM toggles for this. Because it is a separate thing from the host.
Should You Ever Turn It Off?
Sometimes yes. Legitimate reasons I turn it off on my bench:
- Old GPUs with unsigned VBIOS. Some pre-2013 cards will not POST with it on because their Option ROMs predate Microsoft’s signing requirements. Vintage GPU testing, you need this off.
- Dual booting a self-compiled Linux kernel. Mainstream Ubuntu and Fedora are fine. Custom kernel you built yourself, needs the feature off or a shim configured.
- Old bootable utilities. Clonezilla pre-2015. GParted Live from years ago. A few third-party recovery USBs. Anything unsigned.
- Troubleshooting a boot loop you suspect is caused by the firmware rejecting a legit driver. Turn off temporarily, isolate, turn back on.
Flip it back on once the job is done. I keep a sticky note on my monitor because I forgot once and wasted a full week wondering why Vanguard kept kicking me out of Valorant.
The June 2026 Certificate Update
Bit of timeline context if you are reading this before mid 2026. The original certs Microsoft issued for this back in 2011 started expiring in June 2026. Microsoft is rolling out a silent Windows Update that swaps them for new ones on any supported Windows version. For most people, zero action needed. If you are on unsupported Windows, or your OEM stopped pushing UEFI updates, the old keys will age out and future Windows updates might fail to boot.
Two things worth doing now. Run Windows Update so you are current. Check your motherboard vendor for a BIOS update from late 2025 or 2026. Most AM5 and LGA 1700 boards have the new cert bundle already. Older boards still on 2019-era BIOS might not. Microsoft’s official Secure Boot guidance has the full cert-refresh notes.
One more detail. The revocation database (called dbx) gets updated roughly every quarter. Windows Update installs these silently. Run Get-SecureBootPolicy on a fully patched box, you see the current policy GUID. If that GUID does not match Microsoft’s latest published value, you missed an update somewhere. On enterprise networks where Windows Update is blocked by policy, IT pushes dbx updates manually using Set-SecureBootUEFI.
Frequently Asked Questions
How do I turn on Secure Boot?
Reboot, mash Del or F2 to get into BIOS, find the Security tab, flip the toggle to Enabled, hit F10 to save. Done. If the toggle is greyed out, CSM is still on. Kill CSM first, then come back and enable it.
How do I check if Secure Boot is already enabled?
Win+R, type msinfo32, press Enter. Scroll System Summary. Two lines matter: BIOS Mode and Secure Boot State. BIOS Mode should read UEFI. The state line shows On, Off, or Unsupported. That is your answer.
Why is the Secure Boot option greyed out?
Three reasons. CSM is still on. Your disk is MBR. Or the Platform Key got wiped. Kill CSM first. If the disk is MBR, run mbr2gpt to convert it. If PK is missing, go into Key Management and reload the defaults. Pick whichever applies.
Does enabling Secure Boot delete my files?
Nope. Flipping the toggle from Off to On does not touch a single file. What burns people is switching the boot mode from Legacy to UEFI on a disk that is still MBR. Convert to GPT first with mbr2gpt. Then flip. Then your stuff is fine.
Can I enable Secure Boot without reinstalling Windows?
Yeah, on any Windows 10 or 11 install sitting on a GPT disk in UEFI mode. Microsoft has that mbr2gpt tool for converting in place. In 2026 a clean install is almost never needed just for this. Also if you still need a license, our page on free Windows 10 and 11 keys covers generic install keys Microsoft publishes.
Is Secure Boot required for Windows 11?
Yes. No way around it. Windows 11 setup blocks the install, PC Health Check throws a red cross, and you are stuck. TPM 2.0 is the other thing that trips people up. You need both on before setup runs.
Should I turn Secure Boot off to dual boot Linux?
Not these days. Ubuntu, Fedora, Pop_OS, all the big distros have shipped signed bootloaders for years. They boot fine with it on. Only edge case is a kernel you compiled yourself or some dusty old distro.
Wrapping Up
There you go. how to secure boot basically any modern Windows machine, whatever brand it is. Sounds scary the first time. Three clicks once you know where the toggle lives. The hard part is prerequisites: UEFI mode, GPT partition, factory keys loaded, CSM dead. Get those sorted and the rest is a reboot. msinfo32 is your truth source. Not the BIOS. If Windows keeps failing to activate on top of everything else, our Windows 11 activation errors guide takes over where this one stops.
Last updated: April 2026.
